はてなブログを WordPress 風に! > cms-style 記事一覧
はてなブログをどうやって当サイトのデザインにしているかを書いています。
まずは全体の構想と「タイトルとメニュー」の解説です。
01全体の構想
この cms-style の大まかな構想は次のとおりです。各要素は前記事を参照してください。
- header#blog-title ____ タイトルとメニュー
- デスクトップではカテゴリーをメニューとして表示
- スマホではハンバーガーメニュー*1を表示、クリックで aside#box2 を表示する
- div#top-editarea ____ 背景に画像、検索アイコン
- トップページではタグクラウド(予定)
- 記事ページでは記事タイトル
- カテゴリー、アーカイブではそのタイトル
- div#content ____ コンテンツエリア
- 最大幅 1140px をコンテンツエリアとし、それ以上は画像から連続した背景色
- 実質コンテンツは最大幅 800px とする
- aside#box2 ____ カテゴリーと最新記事
- デスクトップでは、カテゴリーを javascript で #blog-title へ移動し、最新記事のみコンテンツ下に配置
- スマホでは、オフキャンバスメニュー*2が右からスライドイン
- div#bottom-editarea ____ フッター
- リンク、プロフィールを直書きして直接配置
- mobile first responsive
- 昨今のスマホのシェアを考慮して、モバイルファーストの Media Queries
ということで、まずひとつ目のタイトルとメニュー(header#blog-title)です。
02スマホ用のオフキャンバスメニューを準備する
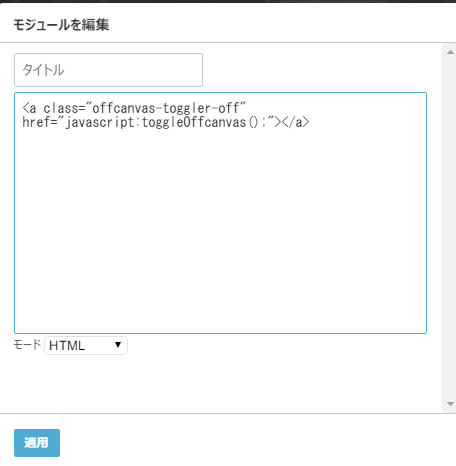
まず、スマホ用のオフキャンパスメニューをカスタマイズ > サイドバーに作ります。


一番上の HTML は、オフキャンバスメニューを閉じるための「×」アイコンです。その内容を右の画像で示しています。

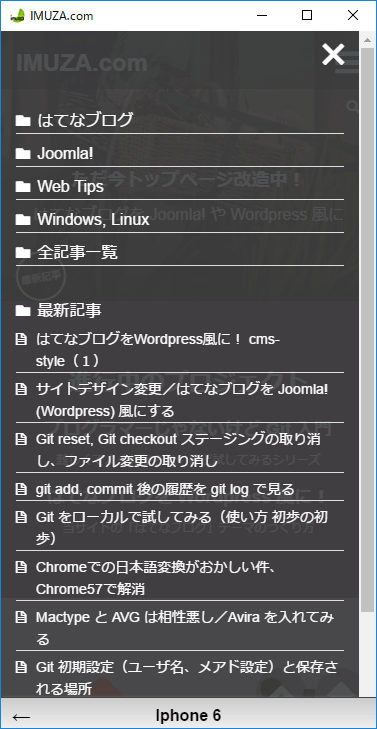
そのオフキャンバスメニューの画像です。シミュレーターですのでスクロールバーがありますが実機では出ません。
03Javascript でタイトル要素にメニュー挿入
ハンバーガーメニューの問題点もいろいろ指摘されていますので文字の「MENU」を入れるなど要検討ではありますが、とりあえずは進めていきます。
header#blog-title は次の構造になっていますので、h1#title の後ろに Javascript でメニューを挿入します。
<header id="blog-title">
  <div id="blog-title-inner" >
    <div id="blog-title-content">
      <h1 id="title">ブログ名</h1>
    </div>
  </div>
</header>
<script>


function toggleOffcanvas() {
  document.body.classList.toggle('offcanvas');
}


(function(){


    var target = document.getElementById('blog-title-content');


    // カテゴリーの記事数を削除
    var categories = document.getElementsByClassName('hatena-module-category')[0];
    Array.prototype.forEach.call(categories.getElementsByTagName('a'), function(category){
        category.textContent = category.textContent.replace(/\s\([0-9]{1,}\)/g, '');
    });


    // CSS の media query と一致させる
    if (window.matchMedia('(min-width: 992px)').matches) {
        // 992px 以上はカテゴリーをタイトル横に移動
        target.appendChild(categories);
    } else {
        // 992px 未満(スマホ、タブレット)はハンバーガーメニューを挿入
        var elm = document.createElement('a');
        elm.setAttribute('class', 'offcanvas-toggler');
        elm.setAttribute('href', 'javascript:toggleOffcanvas()');
        target.appendChild(elm);
    }


})();


</script>
- カテゴリーをメニューにするには記事数が邪魔ですので削除します。
- この例では、992px でメディアクエリーを切って振り分けています。
- スマホの場合は、body に クラス offcanvas を付加/削除することでオフキャンバスメニューの表示/非表示をコントロールします。
Javascript はフッタに入れます。
なお、カテゴリーを変更することがなければ、HTMLモジュールに直書きしたほうが早いです(笑)。
04CSS でオフキャンバスメニューの表示/非表示など
#blog-title-content {
    display: -webkit-flex;
    display: flex;
    -webkit-justify-content: space-between;
    justify-content: space-between;
    align-items: center;
}


.offcanvas-toggler {
    text-decoration: none;
}


.offcanvas-toggler::before {
    font-family: "blogicon";
    content: "\f003";
}


.offcanvas-toggler-off {
    text-decoration: none;
}


.offcanvas-toggler-off::before {
    font-family: blogicon;
    content: "\f025";
}


#box2 {
    position: fixed;
    overflow-y: auto;
    z-index: 9999;
    height: 100%;
    top: 0;
    right: -100vw;
    width: 100vw;
    background: #fff;
    transition: all .3s linear;
}


#box2 .hatena-module-html:first-child {
    text-align: right;
}


.offcanvas #box2 {
    right: 0;
}


@media only screen and (min-width: 992px) {


    .hatena-module-category .hatena-module-title {
        display: none;
    }


    #box2 {
        /* 最低以下の指定を再指定する必要あり */
        position: initial;
        right: initial;
        width: initial;
    }

    #box2 .hatena-module-html:first-child {
        display: none;
    }
}
display:flexなどの対応ブラウザは、Can I use で確認してください。- これは最低必要な指定だけです。デザインにより背景やフォントサイズや位置は調整する必要があります。
これで「タイトルとメニュー」の基本構造は当サイトと同じになるはずです。
