
現在、ブログの整理をしており、あるカテゴリーだけ(カテゴリーがない記事だけ)別のブログに移そうと思うのですが、はてなブログのエクスポート機能はブログまるごとしかできなく不便ですね。
そこで、エクスポートした記事から、あるカテゴリーだけ取り出したり、そこに新しいカテゴリーを追加したりするツールを node.js で作ってみました。
一回こっきりのことですのでエディターのマクロとかで出来るような気もするのですが、node をもっと知りたいということもあってのことですので汎用的なものではありません。
01仕様
- ローカルサーバー用
- フォーム入力
- エクスポートしたファイル(アップロード機能)
- 取り出すカテゴリー(空白の場合はカテゴリーなし)
- 付加するカテゴリー(空白の場合は付加しない)
- 送信ボタン
- フィアル自動ダウンロード
02node.js のインストール
Windows10 の場合です。インストールの方法はググればいっぱいヒットしますが、私は nodist を使っています。
03Webサーバーを立て、ファイルをアップロードする
サーバーはこちらのサンプルコードで簡単に立ちます。
ファイル送信欄を作る
form にファイル送信欄を作るには、input タグの type 属性に file を指定すればファイル選択ボタンが作成されます。また、送信するには、form タグの method 属性に post、enctype 属性に multipart/form-data を指定する必要があります。
const postHTML =
  '<html><head><meta charset="utf-8"><title>Example</title></head>' +
  '<body>' +
  '<form action="" method="post" enctype="multipart/form-data">' +
  '<label>エクスポートしたファイル: </label><br>' +
  '<input type="file" name="file" /><br><br>' +
  '<label>取り出すカテゴリー: </label><br>' +
  '<input name="category"><br><br>' +
  '<label>付加するカテゴリー: </label><br>' +
  '<input name="newCategory"><br><br>' +
  '<input type="submit">' +
  '</form>' +
  '</body></html>';
ファイルアップロードモジュール Formidable
フレームワークの Express を入れていれば、Multer というモジュール(?)がよく紹介されていますが、今回は Formidable を使ってみます。
サンプルコードを参考に、app.js を作成します。
const http = require('http');
const formidable = require('formidable');
const fs = require('fs');
// Get the local downloads folder
// const downloadsFolder = require('downloads-folder');


const hostname = '127.0.0.1';
const port = 3000;


const postHTML =
  //(略)上記;


const server = http.createServer((req, res) => {
  if(req.method === 'POST'){
    const form = new formidable.IncomingForm();
    form.parse(req, (err, fields, files) => {
      if (err) throw err;


      const uploadPath = files.file.path;
//      const downloadPath = downloadsFolder() + '/new_' + files.file.name;


console.log('upload path: ' + uploadPath);
console.log('category: ' + fields.category);
console.log('new-category: ' + fields.newCategory);


      fs.readFile(uploadPath, (err, data) => {
        if (err) throw err;


console.log('file: ' + data.toString());


        res.writeHead(200, {'content-type': 'text/plain'});
        res.write('received upload:\n\n');
        res.end();
      });
    });
  }else{
    res.statusCode = 200;
    res.setHeader('Content-Type', 'text/html');
    res.end(postHTML);
  }
});


server.listen(port, hostname, () => {
  console.log(`Server running at http://${hostname}:${port}/`);
});
コンソールから下記のように打ち、
>node app.js
Server running at http://127.0.0.1:3000/
ブラウザから、http://localhost:3000 とアクセスしますと、
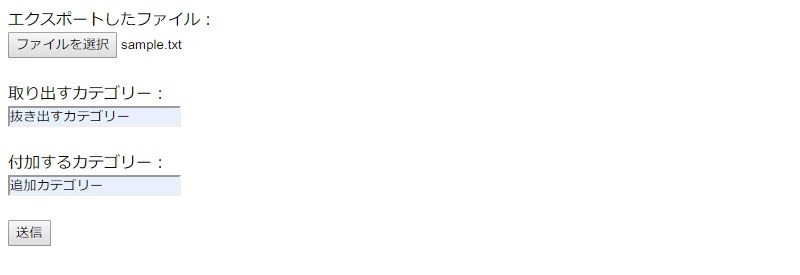
と表示されますので、ファイルを指定し、カテゴリーを入力してファイル送信します。
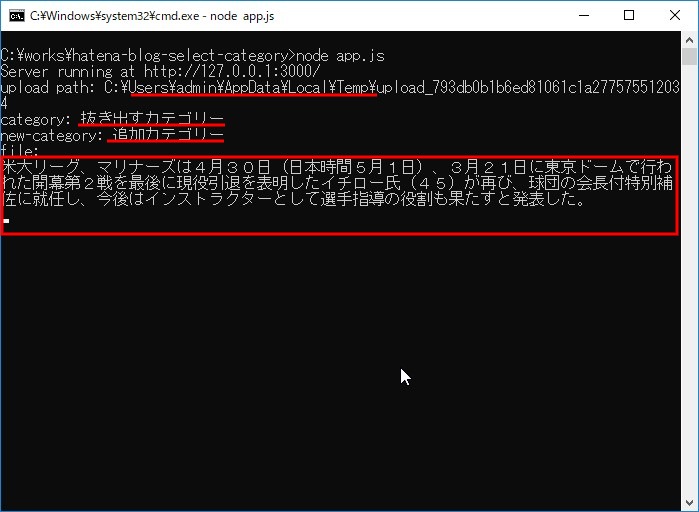
Windows では、ユーザフォルダの \AppData\Local\Temp\ 内に保存されるようです。
04記事データから特定カテゴリー記事を取り出す
はてなブログの記事データは次のようになっています。
AUTHOR: ausnichts
CONVERT BREAKS: 0
IMAGE: /wp-content/uploads/2019/04/20190426102315.jpg
-----
<p><a href="https://nejire-movie.jp/about.php">公式サイト</a>に、アガサ・クリスティー本人が「自身の最高傑作だと誇」ったとある『Crooked House ねじれた家』の映画化です。</p>
(略)
-----
--------
ヘッダと記事は ----- (-×5)、記事ごとは -------- (-×8)のセパレーターが入っていますので、作業としては、
- 記事をセパレーター
--------(-×8)で分割し配列に入れる - 各記事ごとに
'CATEGORY: ' + fields.categoryを含むかでフィルターをかける
また、カテゴリーなしは'CATEGORY: 'があるなしでフィルターをかける - 付加するカテゴリーがあれば、各記事を一行ずつ配列に入れ、
'DATE:'行の次に追加する - 記事配列を連結し、ダウンロードする
という流れになります。
ダウンロードフォルダー
各OSごとのダウンロードフォルダを教えてくれるモジュールがありました。
完成スクリプト
ということで、こうなりました。
const http = require('http');
const formidable = require('formidable');
const fs = require('fs');
// Get the local downloads folder
const downloadsFolder = require('downloads-folder');


const hostname = '127.0.0.1';
const port = 3000;


const postHTML =
  '<html><head><meta charset="utf-8"><title>Example</title></head>' +
  '<body>' +
  '<form action="" method="post" enctype="multipart/form-data">' +
  '<label>エクスポートしたファイル: </label><br>' +
  '<input type="file" name="file" /><br><br>' +
  '<label>取り出すカテゴリー: </label><br>' +
  '<input name="category"><br><br>' +
  '<label>付加するカテゴリー: </label><br>' +
  '<input name="newCategory"><br><br>' +
  '<input type="submit">' +
  '</form>' +
  '</body></html>';


const server = http.createServer((req, res) => {
  if(req.method === 'POST'){
    const form = new formidable.IncomingForm();
    form.parse(req, (err, fields, files) => {
      if (err) throw err;


      const uploadPath = files.file.path;
      const downloadPath = downloadsFolder() + '/new_' + files.file.name;


      fs.readFile(uploadPath, (err, data) => {
        if (err) throw err;
          res.writeHead(200, {'content-type': 'text/plain'});
        res.write('received upload:\n\n');


        const search = (x) => {
          const searchTerm = 'CATEGORY: ' + fields.category;
          return fields.category ? x.indexOf(searchTerm) !== -1 : x.indexOf(searchTerm) === -1;
        }


        const add = (x) => {
          if(!fields.newCategory) return x;
          const addTerm = 'CATEGORY: ' + fields.newCategory;
          var flag = true;
          return x.split(/\r\n|\n/).map((y) => {
            return y.indexOf('DATE:') !== -1 && flag ? (flag = false, y + '\n' + addTerm) : y;
          }).join('\n');
        }


        var articles = new Array();
        articles = data.toString().split('--------');
        const newArticles = articles.filter(search).map(add).join('--------') + '--------';


        fs.writeFile(downloadPath, newArticles, (err) => {
          if (err) throw err;
        });
        res.write('downloaded: ' + downloadPath);
        res.end();
      });
    });
  }else{
    res.statusCode = 200;
    res.setHeader('Content-Type', 'text/html');
    res.end(postHTML);
  }
});


server.listen(port, hostname, () => {
  console.log(`Server running at http://${hostname}:${port}/`);
});
これで、抜き出したカテゴリー記事を別ブログにインポート、元ブログで該当カテゴリー限定のリダイレクトスクリプトを書いておけば、あるカテゴリーだけのブログ移転が出来るはずです。
これは次回です。