あらためて、「CMS「Joomla」を狙ったSQLインジェクション攻撃が増加」の記事が出ています。
ペンタセキュリティシステムズの月例レポート10月版によりますと、Joomla3.2.x-3.4.4、3rdパーティーのエクステンション RealEstateManager、Realtyna RPL、jNews に SQLインジェクションの脆弱性があるそうです。Joomla! 最新版 3.4.5 へのアップデートと各エクステンションを導入している場合は提供サイトのチェックを忘れないようにしましょう。
さて、前回作成した index.html をもとに index.php を作っていきます。なお、通常はこんなやり方はせず、ワイヤーフレームなどで全体の構成を考えてからコーディングにかかります。
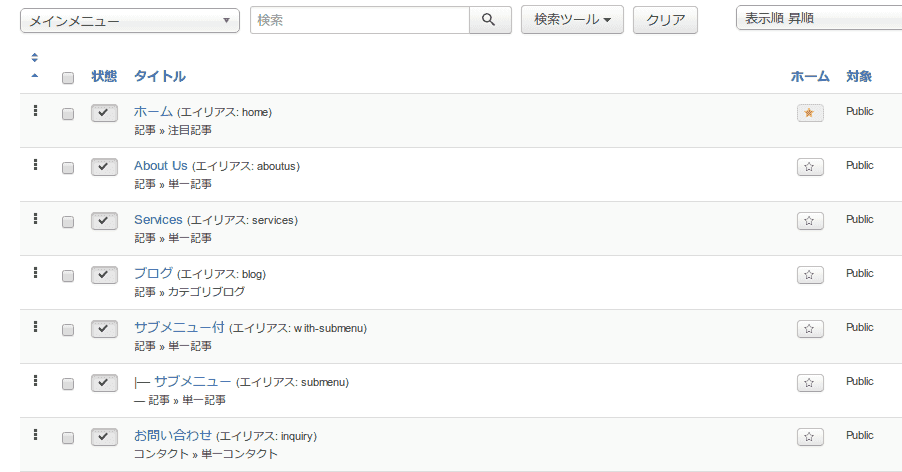
どういう構成でも構いませんが、サブメニューの挙動を見られるようにメニューを作成しておきます。
- 「ホーム」のメニューアイテムは「注目記事」
- 「ブログ」のメニューアイテムは「カテゴリブログ」に指定し、「導入記事数」をパジネーションの挙動が見られるよう作成記事数より少なくしておきます

01ヘッダ情報 <head> の作成
前回作成した index.html のヘッダ情報と </body> 直前のスクリプト4行を生成するように index.php を作成します。
- テンプレート名は $this->template が保持していますので css, js, image ファイルの url を変更します
- フォルダ js 内に jui フォルダを作成し、bootstrap.min.js をコピーしておきます
- template.css を空ファイルで構いませんので作っておきます
<?php
defined('_JEXEC') or die;


$doc = JFactory::getDocument();
$doc->setMetadata('x-ua-compatible', 'IE=edge,chrome=1');
$doc->setMetadata('viewport', 'width=device-width, initial-scale=1.0');
$doc->setGenerator(null); // generator のメタタグ削除


$doc->addStyleSheet('templates/' . $this->template . '/css/bootstrap.min.css');
$doc->addStyleSheet('templates/' . $this->template . '/css/font-awesome.min.css');
$doc->addStyleSheet('templates/' . $this->template . '/css/prettyPhoto.css');
$doc->addStyleSheet('templates/' . $this->template . '/css/animate.css');
$doc->addStyleSheet('templates/' . $this->template . '/css/main.css');
$doc->addStyleSheet('templates/' . $this->template . '/css/template.css');


JHtml::_('bootstrap.framework');
$doc->addScript('templates/' . $this->template . '/js/jquery.prettyPhoto.js');
$doc->addScript('templates/' . $this->template . '/js/main.js');


// Logo image or text or default-image この部分の解説は次項
if ($this->params->get('logoImage')) {
    $logo = '<img src="' . JURI::root() . $this->params->get('logoImage') . '" />';
} elseif ($this->params->get('logoText')) {
    $logo = '<span class="logo-text">' . htmlspecialchars($this->params->get('logoText')) . '</span>';
} else {
    $logo = '<img src="templates/' . $this->template . '/images/logo.png" alt="logo" />';
}
?>


<!DOCTYPE html>
<html xml:lang="<?php echo $this->language; ?>" lang="<?php echo $this->language; ?>" >
<head>
<jdoc:include type="head" />
  <!--[if lt IE 9]>
  <script src="<?php echo 'templates/' . $this->template . '/' ?>js/html5shiv.js"></script>
  <script src="<?php echo 'templates/' . $this->template . '/' ?>js/respond.min.js"></script>
  <![endif]-->
  <link rel="shortcut icon" href="<?php echo 'templates/' . $this->template . '/' ?>images/ico/favicon.ico">
  <link rel="apple-touch-icon-precomposed" sizes="144x144" href="<?php echo 'templates/' . $this->template . '/' ?>images/ico/apple-touch-icon-144-precomposed.png">
  <link rel="apple-touch-icon-precomposed" sizes="114x114" href="<?php echo 'templates/' . $this->template . '/' ?>images/ico/apple-touch-icon-114-precomposed.png">
  <link rel="apple-touch-icon-precomposed" sizes="72x72" href="<?php echo 'templates/' . $this->template . '/' ?>images/ico/apple-touch-icon-72-precomposed.png">
  <link rel="apple-touch-icon-precomposed" href="<?php echo 'templates/' . $this->template . '/' ?>images/ico/apple-touch-icon-57-precomposed.png">
</head>
<body>
</body>
</html>
02ヘッダー <header> の作成
前回作成した index.html のヘッダー要素をコピーし、nav 名のモジュールを読みこむようにします。
- <jdoc:include /> ステートメントはコンテンツやモジュールを読み込むメソッドです
type に modules, componet, head, message を指定します
name はテンプレートの位置(モジュール管理の表示位置)を指定します
templateDetails.xml で指定しますので、nav など好みの名前を入れておきます - ロゴのイメージは、テンプレート管理でイメージ、テキスト、デフォルトイメージの選択ができるようにしますので、上記のようにヘッダ内のスクリプトで $logo に代入し出力します
<body>
    <header class="navbar navbar-inverse navbar-fixed-top wet-asphalt" role="banner">
        <div class="container">
            <div class="navbar-header">
                <button type="button" class="navbar-toggle" data-toggle="collapse" data-target=".navbar-collapse">
                    <span class="sr-only">Toggle navigation</span>
                    <span class="icon-bar"></span>
                    <span class="icon-bar"></span>
                    <span class="icon-bar"></span>
                </button>
                <a class="navbar-brand" href="<?php echo JURI::root(); ?>"><?php echo $logo; ?></a>
            </div>
            <div class="collapse navbar-collapse">
                <jdoc:include type="modules" name="nav" />
            </div>
        </div>
    </header><!--/header-->


</body>
03templateDetailes.xml に config 要素を追加
templateDetailes.xml に config 要素を次のフォーマットで追加すると、テンプレートのパラメータを設定できるようになります。
- <fields /> 内の属性値に従って入力フォームが生成されます
- type の media はイメージアップロード可のファイルマネージャが生成されます
- label は utf8 で保存すれば日本語も可能ですが、通常は別に言語ファイルを作ります(後日予定)
<?xml version="1.0" encoding="utf-8"?>
<extension version="3.0" type="template">
    <name>flat-theme</name>
    <creationDate>2015-11-19</creationDate>
    <author>ausnichts</author>
    <authorEmail></authorEmail>
    <authorUrl>http://www.imuza.com</authorUrl>
    <copyright>Copyright (C) 2015 - IMUZA.com All rights reserved.</copyright>
    <license>GNU/GPL</license>
    <version>0.0.1</version>
    <description>Flat Theme - Free Responsive Multipurpose Site Template
         - See more at: https://shapebootstrap.net/item/1524965-flat-theme-free-responsive-multipurpose-site-template#sthash.3Qja1UAS.dpufMy</description>
    <files>
        <filename>index.php</filename>
        <filename>templateDetails.xml</filename>
        <folder>css</folder>
        <folder>fonts</folder>
        <folder>images</folder>
        <folder>js</folder>
    </files>
    <positions>
        <position>nav</position>
    </positions>
    <config>
        <fields name="params">
            <fieldset name="advanced">
                <field name="logoImage" class="" type="media" default=""
                    label="LOGO IMAGE"
                    description="" />

                <field name="logoText"  type="text" default=""
                    label="LOGO TEXT"
                    description=""
                    filter="string" />
            </fieldset>
        </fields>
    </config>
</extension>
一度テンプレートをインストールしてみましょう。インストール方法は、Joomla!(7)テンプレートを自作する -最もシンプルなテンプレート のテンプレートのインストールを参考にしてください。
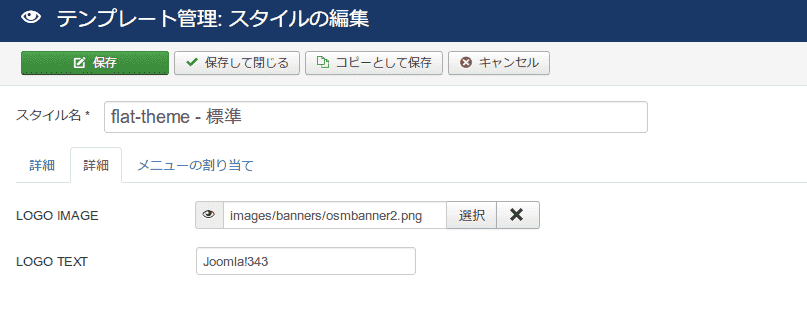
インストールしたテンプレートを標準に適用しても、まだ「Flat Theme」のロゴが表示されるだけだと思います。このロゴは、テンプレート管理 > 詳細 で設定し、イメージ→テキスト→デフォルトイメージの順で探して表示します。

04メニューモジュールの設定
- メニューモジュールの表示位置に nav を選択
- 詳細タブ > メニュクラスサフィックスに 「(要スペース) navbar-nav navbar-right」
上から、ロゴイメージ選択、ロゴテキスト入力、デフォルトの結果です。


サブメニューが展開されていますが、template.css に以下のスタイルを追加すればマウスオーバーで表示するようになります。またはモジュールのテンプレートを変更することで Bootstrap の Dropdown メニューと同等にもできますので、これは次回以降に紹介します。
.nav-child {
    display: none;
}
li.deeper:hover .nav-child {
    display: block;
}
次回は、スライダーなど他のブロックを作成し index.php を完成予定です。
